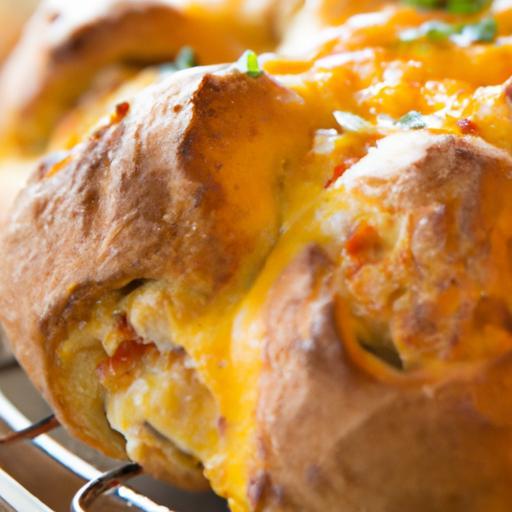
There’s something undeniably magical about cheese melting into warm,fluffy bread-a combination that turns any meal into an unforgettable feast. Enter the Irresistible Cheesy Pull-Apart Skillet Bread,a recipe designed to captivate both your eyes and taste buds. Picture golden, crispy edges giving way to gooey, stretchy cheese hidden within soft, pillowy bites, all baked to perfection in a sizzling skillet. Whether you’re hosting a cozy gathering or simply craving a comforting snack, this recipe promises to deliver layers of flavor and fun with every pull. Ready to uncover the secrets behind this mouthwatering masterpiece? Let’s dive in and reveal how to create this cheesy wonder right in your own kitchen.
The ultimate secret to a delectably gooey and irresistible Cheesy Pull-Apart Skillet bread starts with the perfect cheese blend. Combining cheeses with varying meltability and flavor intensity transforms each pull-apart bite into a symphony of creamy, stretchy, and savory delight. Whether you’re planning a cozy night in or impressing guests with your culinary prowess,mastering this balance will elevate your skillet bread experience from simple to sublime.
Prep and Cook Time
- Planning: 20 minutes
- Resting and Proofing: 1 hour 15 minutes
- Cooking: 25 minutes
- Total Time: Approximately 2 hours
Yield
Serves 6-8 people, perfect for sharing or a hearty snack spread.
Difficulty Level
Medium: Ideal for adventurous home cooks comfortable with yeast dough and skillet baking.
Ingredients
- For the Dough:
- 3 cups all-purpose flour, sifted
- 2 ¼ tsp active dry yeast (1 packet)
- 1 cup warm whole milk (about 110°F/43°C)
- 2 tbsp unsalted butter, melted
- 1 tbsp granulated sugar
- 1 tsp fine sea salt
- For the Cheese Blend:
- 1 cup shredded mozzarella (for stretch and mild creaminess)
- ½ cup shredded fontina (for buttery melt and subtle nuttiness)
- ½ cup shredded sharp white cheddar (for bold flavor and depth)
- ¼ cup grated Parmesan (for savory umami and crust boost)
- Extras & Flavor Twists:
- 2 tbsp fresh parsley, finely chopped
- 1 tsp garlic powder
- ½ tsp smoked paprika (optional, for warmth)
- 2 tbsp olive oil or melted butter, for brushing
Step by Step Guide to Creating the Fluffiest Pull Apart Bread
- Activate the yeast: In a small bowl, combine the warm milk, sugar, and active dry yeast. Let it rest for 5-7 minutes until foamy and bubbling, indicating the yeast is alive and ready.
- Mix the dough: In a large mixing bowl, whisk together the sifted flour and sea salt. Gradually add the melted butter and yeast mixture. Stir with a wooden spoon until a shaggy dough forms.
- knead for fluffiness: Transfer the dough onto a lightly floured surface.Knead vigorously for 8-10 minutes until smooth and elastic. The kneading process is critical-it develops the gluten to trap air, creating the bread’s signature fluffiness.
- First rise: Lightly grease a clean bowl with olive oil. Place the dough inside, turning once to coat. cover with a damp cloth or plastic wrap and allow it to rest in a warm place for 1 hour or until doubled in size.
- Shape the loaf: Gently punch down the risen dough to release air.Divide the dough into 15 equal portions. Flatten each piece slightly, then press a generous amount of the cheese blend in the center and seal the edges to form cheese-stuffed balls.
- Assemble in skillet: Lightly grease a 10-inch cast iron skillet. Arrange the cheese-stuffed dough balls snugly side-by-side, seam side down, filling the skillet completely. This close arrangement encourages the pull-apart effect.
- Final proof: Cover the skillet loosely with plastic wrap or a kitchen towel. Let the dough proof again for 30 minutes to puff up and become pillowy.
- Bake to golden perfection: Preheat your oven to 375°F (190°C). Before baking, brush the dough balls generously with olive oil or melted butter and sprinkle them lightly with garlic powder, parsley, and smoked paprika for an irresistible aroma and crust color.
- Bake: Place the skillet on the middle oven rack and bake for 22-25 minutes. The top should be golden brown while the cheese inside melts into pull-apart lusciousness.
- Cool slightly and enjoy: Remove the skillet from the oven and let it rest for 5 minutes.This makes pulling apart easier without losing all the gooey cheese.
Creative Flavor twists to Elevate Your Skillet Bread
- Herb Infusion: Add fresh thyme or rosemary to your dough or sprinkle finely chopped fresh herbs between the balls for a fragrant bite.
- Spicy Kick: Incorporate a pinch of crushed red pepper flakes in the cheese blend or swirl a thin layer of harissa or chili paste before sealing each dough ball.
- Sweet & Savory: Experiment with a bit of caramelized onion or roasted garlic tucked inside the cheese pockets for a deeper, sweeter contrast.
- Smoky & Bold: Swap cheddar for smoked gouda or add bacon bits for an indulgent, smoky twist.
expert Tips for Serving and Storing Your Cheesy masterpiece
- Serving: Serve warm directly from the skillet for that ooey-gooey experience, garnished with freshly chopped parsley or basil. Pair with a tangy marinara sauce or a creamy garlic dip for extra dimension.
- Storage: Wrap leftover bread tightly in foil or place in an airtight container. Refrigerate for up to 3 days.
- Reheating: Reheat gently wrapped in foil at 350°F (175°C) for about 10 minutes or microwave briefly, then crisp the top under a broiler for 1-2 minutes to revive the cheesy crust and softness.
- make ahead: Prepare the dough and assemble the cheese-filled balls up to the skillet stage. Cover and refrigerate overnight, then let come to room temperature and bake the next day for fresh bread with minimum morning effort.
Nutritional Information (per serving)
| Calories | Protein | Carbs | fat |
|---|---|---|---|
| 320 kcal | 14g | 32g | 16g |
For a deeper dive into bread techniques, visit King Arthur Baking’s Bread Guide.
Check out our Homemade Garlic Cheese Bread recipe for another cheesy favorite to delight your family and guests.

Q&A
Q&A: Irresistible Cheesy Pull-Apart Skillet Bread Recipe reveal
Q1: What makes this Cheesy Pull-apart Skillet Bread so irresistible?
A1: It’s all about the perfect harmony of gooey, melted cheese and buttery, golden-brown bread. Each pull-away piece is an explosion of cheesy goodness wrapped in a crispy, skillet-toasted crust, making it nearly impossible to stop at just one!
Q2: Why cook the bread in a skillet instead of baking it normally?
A2: The skillet creates an ultra-crispy bottom crust that oven baking alone can’t quite achieve. Plus, it’s a speedy and hands-on method that fills your kitchen with an irresistible aroma, inviting everyone to gather around before the bread even hits the table.
Q3: Can I customize the types of cheese used in this recipe?
A3: Absolutely! Whether you prefer sharp cheddar, creamy mozzarella, tangy gouda, or even a sprinkle of parmesan, mixing cheeses allows you to tailor the flavor profile. The melting qualities of the cheese are key, so aim for a blend that melts smoothly and tastes flavorful together.
Q4: What’s the best way to serve this pull-apart bread?
A4: It pairs beautifully with soups, salads, or as a decadent appetizer on its own.For a fun twist, serve it with dipping sauces like marinara, garlic butter, or a spicy aioli to elevate the flavor experience.
Q5: Is this recipe beginner-friendly?
A5: Definitely! The recipe uses simple ingredients and straightforward steps. Even novice cooks will find the process rewarding-and the result is a crowd-pleaser every time.Q6: Can I prepare this bread ahead of time?
A6: While the bread is best enjoyed fresh and warm, you can assemble it ahead and keep it refrigerated. When ready, just heat it up in a skillet or oven to revive that crispy crust and melty cheese delight.Q7: Any tips for ensuring the cheese pulls apart perfectly?
A7: use cheeses known for their stretchiness, and don’t overfill the pockets-too much cheese can lead to gooey spills rather than neat pulls.Also, let the bread rest for a couple of minutes after cooking to let the cheese set slightly, making each pull more satisfying.
Q8: Can this recipe be made gluten-free or vegan?
A8: Yes! Substitute regular flour with a good-quality gluten-free blend and use vegan cheese alternatives that melt well. The skillet technique still applies, delivering that crispy pull-apart magic without compromise.
Ready to dive into cheesy bliss? This skillet bread promises a mouthwatering experience with every pull-get your skillet ready!
The Conclusion
As the gooey strands of melted cheese stretch and the warm, golden crust pulls apart with ease, this skillet bread isn’t just a recipe-it’s an experience. Whether you’re gathering around the table for a cozy night in or looking to impress guests with a show-stopping appetizer, this cheesy pull-apart bread delivers comfort and flavor in every bite. Ready to turn simple ingredients into an unforgettable centerpiece? Your skillet-and hungry friends-are waiting. So grab your apron,preheat that oven,and let the magic of melting cheese and buttery bread bring everyone together,one irresistible pull at a time.