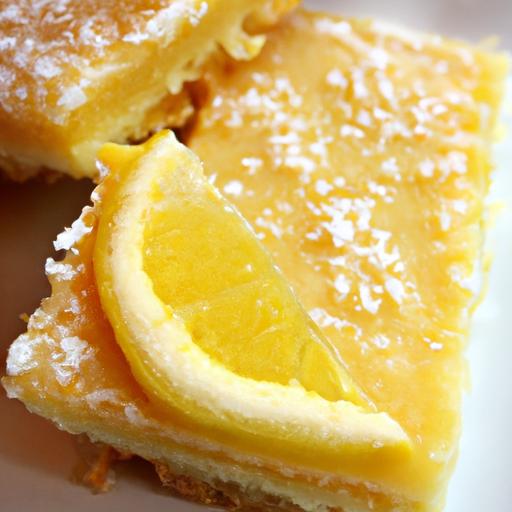
There’s something undeniably magical about the tangy burst of lemon dancing atop a buttery, crumbly bar. But for those who dodge gluten, finding that perfect balance between zest and texture can feel like a daunting quest. Enter “Zesty Delight: How to Make Perfect Gluten-Free Lemon Bars,” your ultimate guide to mastering this citrusy classic without compromise. Whether you’re a seasoned baker or a curious kitchen adventurer, this article will unravel the secrets to creating lemon bars that are not only irresistibly shining and refreshing but also delightfully gluten-free – proving that deliciousness knows no boundaries. Get ready to zest up your baking game and savor every luscious bite!
Zesty Delight: how to Make Perfect Gluten-Free Lemon Bars begins wiht the crucial art of selecting the ideal gluten-free flours to craft a tender, buttery crust that melts in your mouth. Unlike customary flours, gluten-free options require a thoughtful blend to achieve that perfect crumbly, yet sturdy base that supports the luscious lemon filling without crumbling or tasting gritty. Combining brown rice flour for a light texture, tapioca starch for chewiness, and a touch of almond flour for richness creates a harmonious foundation that is both delicate and stable-setting the stage for a dessert that’s as delightful to look at as it is to savor.
Prep and cook Time
- Readiness: 20 minutes
- Baking: 25 minutes
- Cooling & Setting: 2 hours
Yield
Serves 12 generous squares perfect for sharing at any gathering.
Difficulty Level
Medium – Ideal for confident home bakers ready to explore gluten-free techniques with professional results.
Ingredients
- For the Crust:
- 1 cup brown rice flour, sifted
- 1/2 cup tapioca starch
- 1/4 cup almond flour, finely ground
- 1/4 cup granulated sugar
- 1/2 teaspoon fine sea salt
- 1/2 cup unsalted butter, cold and cubed
- For the Lemon Filling:
- 1 cup freshly squeezed lemon juice (about 4-5 lemons)
- 1 tablespoon lemon zest, finely grated
- 1 1/4 cups granulated sugar
- 4 large eggs
- 1/4 cup gluten-free all-purpose flour blend
instructions
- Prepare the crust: In a large bowl, whisk together brown rice flour, tapioca starch, almond flour, sugar, and salt. Add cold,cubed butter and,using your fingertips or a pastry cutter,work it into the flour mixture until it resembles coarse crumbs. Press evenly into a greased 9×13-inch pan. Chill in the fridge for 15 minutes.
- bake the crust: Preheat your oven to 350°F (175°C). Bake the chilled crust for 15-18 minutes or until it’s just beginning to turn golden-avoid overbaking to keep it tender. Remove and let cool slightly.
- Make the filling: While crust bakes, whisk together lemons juice, zest, sugar, and eggs until smooth. Gradually sift in the gluten-free flour to avoid lumps, blending just enough to combine.
- Combine and bake: Pour the filling over the warm crust, returning it to the oven. bake for an additional 12-15 minutes until the filling is set but still slightly jiggly in the center-a silky texture is key.
- Cool to perfection: Remove bars from the oven and allow them to cool fully on a wire rack. Then refrigerate for at least 2 hours to fully set and prevent cracks during slicing.
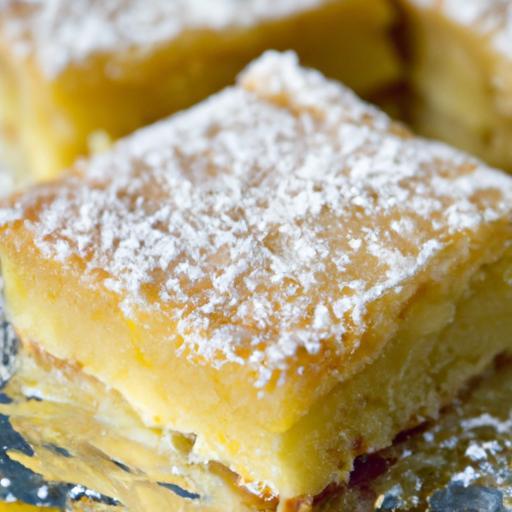
- Slice and serve: Use a sharp knife, wiping it clean between cuts for neat, gorgeous squares. Dust with powdered sugar or garnish with fresh lemon slices for that extra zesty pop.
Mastering the Balance of Tartness and Sweetness in the Lemon Filling
The magic behind these gluten-free lemon bars lies in the interplay of bright citrus tang and mellow sweetness. using fresh lemon juice and zest enhances natural acidity, while simply adjusting the sugar amount fine-tunes that perfect balance. taste your filling before baking-if it feels too sharp, add a teaspoon of honey or maple syrup; too sweet, a splash more lemon juice can enliven the profile beautifully.
Techniques for Achieving the Perfect Silky Texture
To achieve a velvety,luscious lemon filling,gentle and gradual mixing is essential. Incorporate the gluten-free flour slowly and avoid overbeating the eggs, which can create a rubbery texture. Baking just until the center quivers slightly ensures that the filling sets firmly after cooling but remains melt-in-your-mouth soft.Remember, texture is all about timing and care.
Essential Tips for Baking and Cooling to Prevent Cracks
Overbaking is the main culprit for cracks in lemon bars. Baking to the precise moment of setting without drying out keeps the surface smooth. After baking, let the bars cool at room temperature before refrigerating; abrupt temperature changes can cause cracking.Using a gentle hand when slicing and refrigerating well before serving help maintain structural integrity and create stunning presentation slabs.
Chef’s Notes
- For a nut-free variation, replace almond flour with additional brown rice flour plus a tablespoon of cornstarch.
- Store bars in an airtight container in the fridge up to 4 days; flavors deepen beautifully overnight.
- Introducing a teaspoon of vanilla extract in the filling adds warmth and complexity.
- If your crust feels crumbly after baking, use a thin layer of softened butter or a light glaze of honey for binding.
- For extra zing, sprinkle a pinch of sea salt on top before baking the filling.
Serving Suggestions
Presentation is everything with these vibrant lemon bars. Serve chilled on a rustic wooden board or sleek white platter to highlight their sunny color. Garnish with delicate candied lemon slices, a sprinkling of powdered sugar, or a light drizzle of raspberry coulis for color contrast. Pair with a dollop of fresh whipped cream or a scoop of vanilla bean ice cream to balance the tartness and elevate this treat to a dazzling dessert centerpiece.

Nutritional Information
| Nutrient | Per Serving |
|---|---|
| Calories | 180 kcal |
| Protein | 3 g |
| Carbohydrates | 25 g |
| Fat | 7 g |
For more gluten-free baking tips, check out our Gluten-Free Baking Basics Guide. To deepen your understanding of alternative flours, this authoritative resource offers excellent insights.
Q&A
Q&A: Zesty Delight – How to Make Perfect Gluten-Free Lemon Bars
Q1: What makes lemon bars such a beloved dessert, and why choose a gluten-free version?
A1: Lemon bars are adored for their vibrant, tangy citrus punch balanced by a buttery, sweet crust. The zingy lemon filling awakens the palate, making them a refreshing treat year-round. Opting for a gluten-free version opens this delightful dessert to those with gluten sensitivities or celiac disease, ensuring everyone can enjoy that perfect blend of tart and sweet without worry.
Q2: What are the key ingredients for creating the perfect gluten-free crust?
A2: A winning gluten-free crust hinges on a blend of gluten-free flours-usually a mix of rice flour, almond flour, and tapioca starch-to mimic the texture of traditional flour. Butter adds that irresistible richness, while a touch of sugar brings subtle sweetness. Don’t forget a pinch of salt to enhance the overall flavor and balance the citrusy brightness of the lemon filling.
Q3: How do you achieve the ideal lemon filling consistency?
A3: The magic lies in the balance of fresh lemon juice, sugar, eggs, and a bit of gluten-free flour or cornstarch to help it set without being cakey. whisk the ingredients thoroughly to create a smooth, luscious custard. Baking just until it’s set (with a slight jiggle in the center) ensures a silky, velvety texture that melts in your mouth.
Q4: are there any special baking tips to ensure the bars don’t crack or become too crumbly?
A4: Absolutely! First, blind-bake the crust slightly before adding the filling to prevent sogginess. Avoid overbaking the lemon layer; it should still have a soft wobble when you take it out of the oven. Let the bars cool completely in the pan – warm bars are more fragile and prone to cracking. chilling the bars in the fridge before slicing helps clean cuts and a firmer texture.Q5: Can the recipe be adapted for different dietary preferences beyond gluten-free?
A5: Yes! To make dairy-free lemon bars, swap butter with coconut oil or a plant-based margarine. For a refined sugar-free twist, use honey, maple syrup, or coconut sugar instead. Each substitution subtly shifts the flavor profile, but with careful adjustment, the sunny zestiness of lemon bars remains front and center.
Q6: How can one creatively enhance gluten-free lemon bars without overshadowing the classic lemon flavor?
A6: Incorporate a hint of fresh herbs like thyme or basil into the crust or sprinkle zest of complementary citrus varieties (like lime or orange) on top. For a textural surprise, scatter toasted coconut flakes or chopped pistachios after baking. these touches add complexity while keeping the luscious lemon flavor as the star of the show.
Q7: What’s the best way to store gluten-free lemon bars to maintain their freshness?
A7: Store the bars in an airtight container, refrigerated, to keep the custard filling firm and the crust crisp.They can last up to 4-5 days chilled.For longer storage, freeze them wrapped tightly in plastic wrap and foil; just thaw in the fridge before serving, and enjoy a zesty bite anytime!
To conclude
As the final zesty crumbs vanish and the bright citrus notes linger on your palate, you’ll realize that making perfect gluten-free lemon bars is not just a recipe-it’s a joyful adventure in baking. With each tangy bite, you’ve crafted a sweet masterpiece that celebrates flavor without compromise. Whether you’re sharing these sunny squares with friends or savoring them solo, you now hold the key to a gluten-free delight that’s as vibrant and refreshing as a summer afternoon. So next time the lemon calls, you’ll be ready to answer with confidence, zest, and a sprinkle of sweet satisfaction. Happy baking!